VIOLETA Framework – Step-by-Step Guide
In the previous section, we explained what VIOLETA is and why it exists.
Now let’s see how you actually use it to design an educational game.
This part walks you through each step of the process, from defining learning goals to creating a playable prototype and preparing adaptive difficulty.
Overview of the Steps
VIOLETA is structured in 13 steps, but don’t worry—many of them are short.
Here’s a roadmap:
- Define the Atomic Unit
- Identify the Skills Inside the Atomic Unit
- Select a Theme
- Define the Intended Emotional Experience
- Layer Feelings (LF) Process
- Form a Game (FAG)
- Build a Minimum Viable Prototype (MVP)
- Create the Scaling Influence Table (SIT)
- Calibrate Challenge with Adaptive Difficulty
- Temporal Structuring & Schema Graph
- Schema Adjacency Matrix
- Estimate Cognitive Load
- Build the Cognitive Load Matrix
Below you’ll find a short explanation for each.
These 13 steps are summarized here for quick reference.
If you’d like to explore each method in detail—including examples, worksheets, and cognitive theory—check out the full VIOLETA thesis.
1. Define the Atomic Unit
What is the atomic unit that the game should be based on?
An Atomic Unit is a tightly‑coupled cluster of competencies that the player must exercise together so often that they start to feel like one fluent behaviour. Think of it as the smallest “learning package” worth practising in isolation before layering on new content. A clear Atomic Unit lets every subsequent design decision point back to a single, memorable north‑star.
Atomic units that rely on bodily control—like horse riding or knife handling—aren't implemented in this version. These practical skills will be supported in a future release, so please avoid using them as atomic units for now.
Below you’ll see three sample Atomic Units. Each bold headline names the unit; the indented bullets show the sub‑skills that compose it.
Time‑management:
- Planning daily/weekly work
- Time tracking & reflection
- Prioritisation & batching tasks
- Controlling distractions
Strategic planning:
- Defining long‑term objectives
- Scenario analysis & risk evaluation
- Resource allocation & sequencing
- Monitoring key metrics
Empathy:
- Perspective‑taking
- Emotional regulation
- Compassionate feedback & support
An Atomic Unit is wider than a single learning objective – it bundles related, mutually‑reinforcing skills so the player practises them as a coherent package. By surfacing the whole bundle early you make it obvious what "good play" will look like in real life.
An atomic unit can be tight (single micro-skill like assertive communication) or broad (systems thinking). Pick a bundle your audience actually needs and you can prototype in the time you have.
2. Identify the Skills Inside the Atomic Unit
What knowledge, actions, and/or skills are necessary to master this atomic unit?
Think of sub-skills as the building blocks of your Atomic Unit. Each one should be bite-sized enough to spot during a play-test, yet vital enough that omitting it would leave a glaring hole. If the Atomic Unit is a single fluent sentence, sub-skills are the words that compose it.
Time-management:
- Time Tracking
- Calendar and Scheduling
- Goal Setting (e.g., SMART framework)
- Prioritization Frameworks
- Strategic planning
- Planning and Delegation
- etc.
Game mechanics can reinforce only the behaviours they compel the player to perform. Explicitly spelling out the constituent sub-skills at this stage therefore converts a broad ambition—say, “foster empathy”—into an actionable design directive such as “create a feedback loop that rewards players for accurately paraphrasing what they heard.” This granularity keeps every future core loop anchored to a specific learning outcome and safeguards the internal cohesion of the atomic unit as themes and mechanics are layered on.
Breaking the atomic unit into sub-skills now gives you surgical control later—when you’re matching emotions, choosing mechanics, and laddering difficulty tiers.
Every sub-skill must serve the same overarching goal. If one feels unrelated, save it for a future release.
If your list feels unwieldy, group related skills. For time-management we use four buckets: Use Tools, Apply Techniques, Develop Personal Skills, Build Habits. The categories aren’t mandatory, just a way to tame complexity.
3. Select a Theme
In what kind of world or situation would someone need to use the skills from my atomic unit regularly?
A Theme is the story-world that makes your Atomic Unit come alive. The stronger the fit, the less you have to explain—every quest, obstacle, and reward naturally asks the player to lean on the target skills.
20-Year-Old Entrepreneur-Student-Athlete Juggles classes, a fledgling start-up, marathon training, and a social life—time-management is survival.
Mars Colony Pioneer Balancing oxygen, crops, and crew morale turns strategic planning into life support.
First-Rotation Medical Intern In a chaotic hospital, empathy turns confusion into trust and better outcomes.
A well-chosen Theme aligns narrative, mechanics, and feedback so every in-game action reinforces the same lesson—no shoe-horning required.
Your theme can be realistic, fantastical, or even metaphorical—the key is that it keeps the atomic-unit skills in constant, believable use so players practise them every round.
4. Map the Emotional Arc
If someone truly lived inside this theme—while actively using the atomic-unit skills—what would they gradually feel, and why?
An Emotional Arc is the heartbeat of your game. Pin it down now and every rule, reward, and setback can be tuned to hit the right note at the right moment.
- Write a tiny vignette (2–3 sentences) that traces the player’s inner journey.
- List the 3-5 must-hit feelings.
At this stage you are not designing mechanics, rules, or win conditions.
Focus solely on the inner experience; gameplay details come in Step 6.
Vignette
You open the week drowning in overlapping deadlines. Small victories—an email sent on time, a workout logged—create breathing room. By Friday you’re orchestrating tasks with confident ease.
Key feelings
- Constant pressure & overwhelm
- Spark of control
- Steady progress
- Confident flow
Emotions drive memory. When the learning path feels believable and rewarding, the skills stick long after play ends—and the pacing knobs you’ll set later (STACK tiers, rewards, feedback) all reference this arc.
5. Layer Feelings (LF) Process
“How do these emotions stack or flow—does one unlock another, or do they run in parallel?”
The Layer Feelings (LF) step turns a loose list of emotions into a mini-map. By arranging states in hierarchies (big feelings that contain smaller ones) or sequences (A → B → C), you give every mechanic a clear emotional target. Prefix each line with dashes (-, --, ---, ...) to indicate depth.
- Progress -- Gradual control
- Constant pressure
When the feeling map is clear, you can spotlight the right emotion at the right moment—pressure in early rounds, micro-wins later—so the player’s heart matches the learning curve.
Feelings can stack, lead to each other, or sit side-by-side. Pick the arrangement that makes intuitive sense and jot why—even one sentence is enough.
You’ll use this mini-map immediately in “Form a Game,” gluing one core mechanic to each feeling you listed.
6. Form a Game (FAG)
What kind of mechanic would make the player feel this emotional state naturally, through gameplay—not through narrative or dialogue?
Take every emotion from your LF map and anchor it to a core mechanic. If the player keeps using that mechanic, the feeling should emerge on its own.
- Top-down mapping – Start at the root emotion, pick one mechanic that evokes it.
- Child-supports-parent rule – For every sub-emotion, choose a mechanic that also reinforces the parent feeling above it.
- Build a Base Mechanics Tree (BMT) – Copy your Layer-Feelings sketch and replace each emotion with its mechanic(s). This tree becomes the blueprint for later steps.
- Steal shamelessly – Mechanics can come from video games, board games, tabletop RPGs, or real-world systems—anything that naturally triggers the target feeling.
Terms like “Deck-building” or “Tight margin of success” can stay fuzzy here. You’ll nail down concrete rules in Step 7 (MVP).
Layer Feelings recap
- Progress
- Gradual control
- Constant pressure
Chosen mechanics
- Progress → Deck-building, Skill-tree
- Gradual control → Expanding action options
- Constant pressure → Tight margin of success (very small error budget)
Base Mechanics Tree (BMT)
- Deck-building
- Expanding action options
- Skill-tree
- Expanding action options
- Tight margin of success
When emotions ride on mechanics, you get play-tests where learners say “I felt it click.” The BMT you just created is the structural bridge to Step 7 (MVP) and every pacing & difficulty tool that follows.
7. From Base Mechanics Tree to MVP – Building a Playable Prototype
Which concrete game elements does this mechanic consist of?
(Start with one entry from your Base Mechanics Tree)
With the Base Mechanics Tree in place, the next step is translating each mechanic into a tangible slice of gameplay. This Minimum Viable Prototype (MVP) is intentionally bare bones, yet it should already showcase the core mechanics and emotional arc. It forms the foundation for upcoming work like triadic integration and difficulty alignment.
- Goal – produce a playable prototype that expresses the selected mechanics and feelings.
- Outcome – a complete List of Schemas (LoS) capturing every component, action, system and information track.
- Pick a BMT mechanic.
- Decompose it. Ask: “Which game elements (components, actions, rules) bring this mechanic to life?”
- Theme-fit check. For every new element ask: “What does it represent in our theme, and how does it function?”
- Recurse on each new element until nothing vital feels missing. Use the Done button in the tool when you want to record an element without breaking it down further.
- Log everything (components, actions, loops, info tracks) in a List of Schemas (LoS)—this is the artefact later steps rely on.
The editor provides a helper chat called step7_theme_fit. After you save an element in the Theme stage, the conversation resets so you can ask how that element fits your theme, using the vignette and kernel mappings for context.
| BMT mechanic | Decomposed elements | Thematic meaning |
|---|---|---|
| Deck-building | Cards, draw pile, discard, shop | Daily actions you choose / drop |
| Hand-limit 2 | Initial constraint | Feeling of chaos & lack of control |
| Daily board (24 slots) | Grid where cards are placed | Real-time schedule |
| Skill tree | Upgrade nodes, progress points | Learning new time-management techniques |
Early build clichés: draw 2 cards, play in order, feel the squeeze; unlock bigger hand and card skips via the skill tree → emotional arc of gradual control.
Every tweak now saves ten later—and your finished LoS becomes the raw material for difficulty tuning and cognitive-load checks.
Feel free to adapt or skip the micro-workflow if you have your own process—the only requirement is a coherent MVP that still matches the skills, emotions, and mechanics you mapped earlier.
Submechanic: Amount of Options Available
Early turns may restrict the player to a hand size of only 2 cards. This forced play evokes frustration and mirrors real-world chaos. Upgrades earned through the skill tree gradually expand the hand limit and allow skipping or delaying cards, shifting the feeling toward meaningful control.
Repeat the same reflection for other child mechanics—Buy/Sell Cards, goal systems, and so on. Check that each expansion of options serves the intended emotional arc.
What is the List of Schemas?
The LoS is the catalogue produced by this breakdown. It lists all components, player actions, information tracks, passive systems and structural loops. This inventory becomes the backbone for later balancing and evaluation.
This step is generative. Breaking down mechanics and tying them back to the theme ensures every rule directly supports the emotions and skills you mapped earlier.
The prototype created here is only a starting point. Many elements may change during integration and difficulty balancing, but having a playable slice anchors the upcoming work on solid ground. Once this MVP exists, you can meaningfully apply the next two phases—Triadic Integration and Difficulty Alignment.
8. Create the Scaling Influence Table (SIT)
When this skill fires, which feeling moves—right away?
The SIT is a one-page dashboard that shows direct cause-and-effect: Skill → Emotion.
Fill it in and you’ll instantly see where to double-down—or trim fat—before the next prototype.
- Rows = atomic-unit skills.
- Columns = top-level emotions only—leave out child emotions for now.
- Mark “+” only for direct impact. If the skill instantly raises or lowers the emotion, add a + and jot a one-line rationale in your notes; leave the cell blank otherwise.
- Creative licence. Two designers may map skills differently—what matters is that every + is logically justified.
- Save your table. The rows you tick here feed straight into the next step: the Triadic Integration Table (TIT).
No maybes, no second-hand links. If the skill influences the emotion via something else, leave the cell blank.
| Atomic-Unit Skill | Progress | Constant Pressure |
|---|---|---|
| Planning | + | |
| Energy Management | + | |
| Task Management | + | |
| Calendar Use | + | |
| Goal Setting | + | + |
Why the pluses?
- Planning → Progress: Clear plan shows you’re moving forward.
- Goal Setting → Constant Pressure: Setting targets lets us manage pressure.
(Record reasons like these in your design log.)
A crisp SIT keeps your design laser-focused: every mechanic you push should visibly boost a skill and the feeling it’s meant to shape—no guesswork, no wasted features.
Build the Triadic Integration Table (TIT)
Now turn each Skill ↔ Emotion “+” from the SIT into a concrete, testable match-up of mechanics.
Column recipe (matches your sketch)
| Column | What goes here |
|---|---|
| 1 – Mechanic / Schema | Every concrete component or action that sits under the BMT node for the target emotion (e.g., cards, draw phase, skill-tree entry). |
| 2 – Atomic-unit skill | Repeat the skill you’re integrating (e.g., Planning). |
| 3 – Supports child emotion? | Tick ✓ if it reinforces the child emotion (Amount of Options for Progress), leave blank if neutral, ✗ if it conflicts. |
| 4 – Result & rationale | Accept, Revise or Reject plus one short sentence of “why”. Afterwards update the LoS if accepted. |
Worked micro-example (Planning → Progress)
| Mechanic (schema) | Skill = Planning | Supports Amount of Options? | Result / Rationale |
|---|---|---|---|
| Skill-tree entry | ✔️ | ✓ | Accept. Unlocking “Planning” expands the number of daily action slots, directly raising options. |
| Cards → Play Card | ✔️ | ✓ | Accept. Player chooses card order → explicit planning; more order permutations = more options. |
| Cards → Draw Card | ✔️ | ✗ | Revise. Random draw undermines planning; consider allowing a “preview top 3” upgrade. |
| Cards → Sell Card | ✔️ | ✓ | Accept. Trimming bad cards increases meaningful choices each turn. |
| Cards → Buy Card | ✔️ | ✓ | Accept. Buying specialised cards widens future planning paths. |
Legend – ✓ = supports the child emotion; blank = neutral; ✗ = in conflict.
- Accept if the mechanic expresses the skill and is at least neutral toward the child emotion.
- Revise if a small tweak can remove conflict or add support.
- Reject if the mechanic fights the child emotion and can’t be fixed without losing purpose.
When every skill-emotion pair from the SIT is processed through a TIT like this, you finish the triadic weave:
Real-life skill ➜ Emotion ➜ Concrete mechanic
That structure is what later enables adaptive difficulty, load calculations, and solid play-testing.
9. Calibrate Challenge with Adaptive Difficulty
Is the player coasting — or drowning?
STACK (Structured Tiered Adaptive Core Knowledge) is your in-game difficulty dial.
It adds complexity only when the player proves they can handle it, keeping brains in the sweet spot between boredom and overload.
- Cognitive-Load Theory says working memory can juggle ≈ 7 interacting “chunks” (schemas).
- Each tier introduces just enough new schemas to stay under that cap.
- The next tier unlocks only after the current tier’s schemas are fluent (quick, low-error play).
- If a player stalls, use the 3E scaffold (Expose → Experiment → Evaluate) to supply feedback without force-feeding more content.
- Fast learner → clears the gate on first try, jumps to the next tier.
- Struggling learner → repeats the tier with minor hints until mastery clicks. Nobody is bored, nobody is flooded.
| Tier | New schemas introduced | What the player feels |
|---|---|---|
| 1 – Basics | Draw 2 cards, Play 2 cards | Claustrophobic squeeze |
| 2 – Energy Twist | Energy bar, Energy cost per card | Trade-offs around daily peaks |
| 3 – Strategic Vision | Weekly goals, Risk-reward missions | Big-picture planning rush |
(Each tier adds only 1-3 fresh schemas, keeping total active chunks ≤ 7.)
When challenge rises in step with mastery, players stay motivated, feel competent, and learn faster — exactly what Self-Determination Theory (SDT) prescribes.
10. Temporal Structuring & Schema Graph
When does each action happen, and what must the player grasp first?
Use two fast-lane tools to keep learning smooth:
- Time Table (TT) — names the repeatable phases that rhythm your loop.
- Schema Graph (SG) — arrows that show which mechanic unlocks or turbo-charges another.
How to draft TT in 2 steps
- Scan your LoS. Highlight every schema that’s time-gated (e.g., “Draw Cards” must occur first).
- List phases → this becomes the TT. Order them exactly as they repeat (Draw ➜ Play ➜ Upkeep …).
How to draft SG in 3 steps
- Drop each schema node onto the SG.
- Add arrows:
- Vertical = “Master A before B makes sense.”
- Horizontal ↔ = “A and B teach each other faster — safe to debut in the same STACK tier.”
- Write one-line rationales for every arrow. The SG is a design argument; clarity beats prettiness.
Partial Example from the Time-management prototype
Time Table (TT) – Daily Loop
| Phase | Key schemas that first appear here |
|---|---|
| Draw | Draw Cards |
| Play | Play Cards, Energy Check |
| Upkeep | Sell Card, Buy Card, Pick Skill |
Schema Graph (simplified visual)
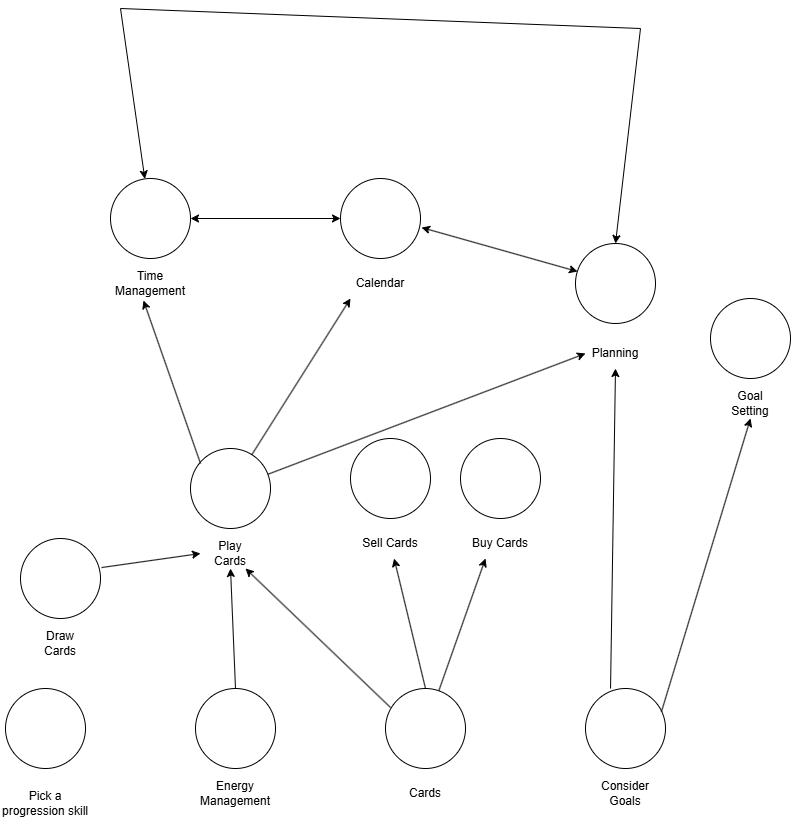
- Legend — white dots = schemas.
- Vertical (e.g., Draw Cards to Play Cards): you must have cards in hand before playing.
- Horizontal ↔ (e.g., Task Management ↔ Calendar Use): learning one accelerates the other because both manipulate future hours.
Two designers may draw different arrows; what matters is that each link is justified and keeps total active schemas per STACK tier ≈ 7 or fewer.
A clear TT + SG drip-feeds complexity in the right order: players stay challenged, never swamped — so the skills you care about click and stick.
11. Schema Adjacency Matrix (SAM)
Which mechanic unlocks—or depends on—another?
The Schema Adjacency Matrix (SAM) translates your Schema Graph into a clear, structured table. It helps you see exactly how each mechanic connects to the rest of your design.
How it works:
- The SAM is a square matrix:
- Rows = source schemas (the enablers)
- Columns = target schemas (the dependents)
- Each cell shows whether one schema directly unlocks another:
1means there is a dependency.0means no direct connection.
Add Totals:
- Total Outgoing (per row): how many other schemas this mechanic enables.
- Total Incoming (per column): how many other schemas must be learned first.
How to use it:
- Schemas with high outgoing and low incoming totals are foundational (learn early).
- Schemas with high incoming totals are capstone (unlock later).
- Schemas with both high incoming and outgoing can be integrative or strategic.
| Draw | Play | Plan Ahead | Total Outgoing | |
|---|---|---|---|---|
| Draw | – | 1 | 0 | 1 |
| Play | 0 | – | 0 | 0 |
| Plan Ahead | 1 | 1 | – | 2 |
| Total Incoming | 1 | 2 | 0 |
- Draw enables Play.
- Plan Ahead depends on both Draw and Play.
- Draw has high outgoing → foundational.
- Plan Ahead has high incoming → capstone.
By scoring and sorting schemas, you instantly know what to teach first and what complexity to layer in later. This clarity is essential for smooth, adaptive learning progression.
12. Estimate Cognitive Load
How heavy is this mechanic on a newcomer’s brain?
Intrinsic Cognitive Load (ICL) is the mental effort required to learn or execute a schema in isolation, before it starts interacting with other mechanics. According to Cognitive Load Theory (Sweller et al., 1998), it depends on how many information elements must be processed simultaneously in working memory.
However, it is not a precise number—it depends on the player’s prior knowledge, familiarity, and the extent to which elements have been internalized into schemas. In VIOLETA, estimating ICL is a creative and interpretative step, not an exact calculation.
How to Estimate Load
Use the number of meaningful decisions or data chunks as a proxy.
- If the mechanic requires 1 clear choice, its load is low.
- If it forces comparative evaluations or multiple steps, its load increases.
Assume minimal prior knowledge.
- Even if experienced players might chunk decisions, beginners will experience them as separate elements.
- This cautious baseline helps avoid overload in early tiers.
Explain your reasoning.
- Reflect on why you picked the number.
- Document your thought process to make it transparent.
Example of Estimation
Play Cards
- The player draws 2 cards and assigns them to time slots.
- If they only think "Which goes first?" → ICL = 1.
- If they compare permutations → ICL = 2.
Sell Cards
- Choose 1 card from 100 options.
- Decision space is wide, but no interdependencies.
- ICL = 1.
Buy Cards
- The load depends on how many options you present.
- Example: offering 3 options is easier than 7.
- Mark this as variable (X) if adjustable.
Variable-Load Schemas
Some schemas have parameterizable load—you can adjust difficulty by changing how many options or layers they offer.
These are valuable difficulty levers for STACK tiers.
Examples:
- Buy Cards: Show 3, 5, or 7 options.
- Pick a Progression Skill: Varies by phase or player skill.
Other schemas have fixed load and can’t be tuned without redesign.
Quick Load Table Example
| Schema | Intrinsic Load |
|---|---|
| Draw Cards | 1 |
| Play Cards | 2 |
| Energy Management | 1 |
| Long-term Planning | 4 |
| Buy Cards | X (variable) |
Tip: Aim for a total of ~7 elements in early gameplay.
If the combined load exceeds this, consider splitting mechanics across STACK tiers.
Estimating intrinsic load helps you:
- Design Tier 1 experiences that are challenging but not overwhelming.
- Plan adaptive difficulty ramps as players progress.
- Create a clear baseline to combine with interactivity load later.
Estimating Element Interactivity Load (EIL)
Even if a schema is easy on its own, it can become much harder when combined with others. Element Interactivity Load (EIL) measures how much extra mental effort arises when schemas interact during play.
When players must juggle overlapping mechanics, the cognitive load increases beyond the sum of parts. To track this, you create an Element Interactivity Matrix (EIM) for each gameplay phase.
Why It Matters
- Intrinsic Load tells you how heavy a mechanic is by itself.
- Element Interactivity Load shows how much harder it gets when multiple mechanics are active together.
- Both are crucial for designing STACK tiers that feel challenging but manageable.
How to Build an EIM
Follow these steps for each gameplay phase (e.g., Play Phase, Upkeep Phase):
- List all schemas in the phase as both rows and columns.
- Fill the diagonal with "–" (a schema doesn’t interact with itself).
- Ignore cells below the diagonal (to avoid counting twice).
- For each remaining cell:
- Write
1if the two schemas interact and increase mental load. - Write
0if they are independent.
- Write
- Sum each row to calculate how many other schemas each one interconnects with.
- Sum the totals at the bottom to get the Element Interactivity Load (EIL) for that phase.
Tip: Only the final EIL total matters for later steps—it doesn’t matter which schema initiated the connection.
Example: EIM for Upkeep Phase
| Buy Cards | Pick Skill | Consider Goals | Goal Setting | Total Interactivity | |
|---|---|---|---|---|---|
| Buy Cards | – | 0 | 1 | 0 | 1 |
| Pick Skill | – | 1 | 0 | 1 | |
| Consider Goals | – | 1 | 1 | ||
| Goal Setting | – | 0 | |||
| Total | 3 |
EIL for Upkeep Phase = 3
Example: EIM for Play Phase
| Consider Goals | Task Mgmt | Calendar | Planning | Energy Mgmt | Total Interactivity | |
|---|---|---|---|---|---|---|
| Consider Goals | – | 1 | 1 | 1 | 1 | 4 |
| Task Management | – | 1 | 1 | 1 | 3 | |
| Calendar | – | 1 | 1 | 2 | ||
| Planning | – | 1 | 1 | |||
| Energy Management | – | 0 | ||||
| Total | 10 |
EIL for Play Phase = 10
How to Decide if Two Schemas Interact
Ask yourself:
- Do players have to consider them together to make a decision?
- Does using one mechanic affect how they use the other?
Example:
- Buy Cards + Consider Goals: You can’t pick a card without thinking about your goals.
- Task Management + Calendar: Scheduling affects when tasks happen.
- Energy Management + Planning: Energy constraints shape long-term priorities.
Determining interactivity requires judgment and experience. Be transparent:
- Explain why you marked a 1 or 0.
- Reflect on how new players will likely perceive the overlap.
- Remember: it's better to slightly overestimate load than to underprepare learners.
Next Step
When you have the Intrinsic Load and the Element Interactivity Load for each phase, you’ll combine them into the Cognitive Load Matrix in Step 13.
13. Build the Cognitive Load Matrix
Does each phase push—but not fry—the player’s brain?
The Cognitive Load Matrix (CLM) sums up all the mental effort in each phase.
It shows:
- Intrinsic Load: How heavy each mechanic is alone.
- Interactivity Load: How much mechanics tangle together.
Together, these tell you whether the phase is too easy, too hard, or just right.
How to Build the CLM
Step by step:
-
Create columns:
- Phase Name (or default if no phases present)
- One column for each schema
- Interactivity Load (EIM)
- TOTAL LOAD (sum of intrinsic + interactivity)
-
Create rows:
- One for each gameplay phase (e.g., Play, Upkeep)
-
Fill cells:
- In schema columns, write the Intrinsic Load if active in that phase, else 0.
- In the EIM column, write the Element Interactivity Load.
- Sum across the row to get TOTAL LOAD.
Variable Loads
Some schemas have variable load (e.g., Buy Cards might show 3 or 7 options).
Use placeholders (X, Y) to keep this flexible and tune the load to stay near the threshold.
Tip: You can adjust these numbers later as you test.
Example CLM
| Phase | Play Cards | Draw Cards | Buy Cards | Energy Mgmt | EIM | TOTAL LOAD |
|---|---|---|---|---|---|---|
| Upkeep | 0 | 0 | X | 0 | 3 | 5 + X |
| Play | 2 | 1 | 0 | 1 | 10 | 14 |
- Upkeep Phase: Variable (X). Tune this to reach ~7.
- Play Phase: 14 is too high—will overwhelm new players.
Interpreting the CLM
If TOTAL LOAD is >7:
- Delay schemas.
- Split mechanics across STACK tiers.
If TOTAL LOAD is < 5 :
- Add depth or more options to avoid boredom.
Use the Schema Adjacency Matrix (SAM) to help:
- Keep foundational schemas (high outgoing connections).
- Delay peripheral schemas (low incoming/outgoing).
Iteration Workflow
Balancing the CLM is an iterative process:
- Check if any phase is overloaded.
- Delay the heaviest schemas.
- Rebuild the EIM for the new set.
- Recompute the CLM.
- Repeat until every phase is near the sweet spot.
Tip: This is also how you build STACK tiers—each tier adds just enough new load to keep learning brisk but not overwhelming.
Adjusting for Mastery
As players practice, schemas get easier. You can:
- Reduce Intrinsic Load (e.g., from 2 → 1).
- Remove mastered schemas from future CLMs.
This lets you gradually increase complexity while keeping cognitive load stable.
Remember: the ~7-element limit is a guideline, not a law.
Some players can handle 8–9, but higher loads risk frustration.
When each phase stays inside the cognitive sweet spot, players:
- Feel competent
- Stay engaged
- Learn faster
What Happens Next?
After Step 13, you have:
A clear design
A prototype
A plan to gradually introduce complexity
Final Tips
- Don’t rush. Each step builds on the previous.
- Feel free to iterate—VIOLETA is flexible.
- Use the triadic integration mindset: Skills + Emotions + Mechanics.
👉 For detailed examples, check the full thesis.